Posts

Showing posts from 2018

bottle cap pins

Image
My son, Erik and I had a set of tables at anime expo and decided to work together on sone pins for fans He did all the design work and we printed the cirles and cut them out then we put them into bottle caps and resined over the Then we attached pin backs to them and sold then as a set. If I am remembering right, they were taken off the magic object in the final fantasy game. Erik is a very good artist. You should check him out at Pateron.com/neibaurart. It is a fun way to support artist and can cost as little as $1 a month. (I think the best level, if you can afford it is the $10 a month level as there is so much content and some personal blog post at that level). He would love to add you as a member of his Patreon family

Perler Play

Image
Another thing I did  on a long trip with my husband (who is really a super sport about my project, especially when I haul a bunch of supplies on driving trips) was perler beads I tried a lot of different patterns and sorted a lot of mixed pack of beads these were some of the designs I took with me to a comic con when I had a selling table in the artist section. These also can with me to the same convention but the star wars dragons pokemon and Dr Who sold the best He are some of the others that did well These were just some I did for fun but amazingly they all did alright at the show It was fun and I might try the tiny ones for some comic con style jewelry for next year

jewelry box

Image
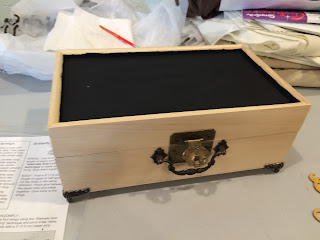
This piece was another mixed media project. I took a wood box I bought at Hobby Lobby and painted it black then I cut out some words on my Cricut  next I tried my hand ay some simple quilling I then assembled them in the recessed lid of the box and used quartz chip and resin to create the lid Then I decoupaged the sides of the box and covered it with modge podge Here is the stage before it s finished I am sorry to say I cannot find the picture of the finished project. I am sure I will be doing another on in the future. This one was a prize at an event in Kansas last year

Fabric Fun

Image
These first two pictures are not that good and very old. It was something I did for my first child. We were students at the time and I was able to find all the things I need to make the wall hanging and all the crib  linens on sale. I think everything cost me about 10 dollars in total. Both the fabric was on super sale and things were cheaper then, but I was still so proud to be able to give our baby such a fun space and do so within the budget we had. This next piece was a purse I designed and sewed fo another swap I did at an event. Now this project kinda got out of hand. I wanted to learn some tye dye  styles  I think I must have done close to fity shirts In all kinds of colors and patterns. My husband told me he was worried that all his clothing would look like they came from the sixties. (I did not touch any of our normal clothing though) Here is the results of that weekend of tye dye binging I ended up taking them to a show a month later and they

Resin and crystals

Image
One of the things I experimented with was resin cast crystals to make pieces to use in mu jewelry They came out fun and the variety you coulf do with chips of precious stones was really intriguing  Butterfly were one of the beginning ones I worked with Some I even used flakes of gold in for coloring and effect Then I worked on some leaf designs getting a fall feel to them Then I went on to hearts for more necklaces here is a closer look at one of them i will probably come back to using some of the things I learned doing these pieces soon.

Mirror, Mirror

Image
For a retreat I went to we were told to create some mirror to exchange as a swap. I started with just some dollar store mirrors and decorated them up . I did several to decide which one I wanted to take along and swap I decide I likes the butterflies best so that was the one I choose Next I had to decide what kind of packaging to use. I choose a book I picked up at a thrift store. Then I cut out the center so the mirror would fit in and glued the pages together to have a hiding place in the book. Finally I decorated the inside cover and first page to accent my project When finished, the mirror fit nicely inside this mother goose story book